Nokia Lumia 920 Vector Graphic Tutorial
20:19:00
I had made a Nokia N9 vector graphic a while back, and I thought of making a tutorial for that. But Nokia has released the new Lumia 920. However, as the N9 and the 920 have similar bodyshells, they're not that different. The N9/920 is also a simple phone to recreate using vector graphics, so it's a great for beginners as it covers most of the concepts of vector graphics. Sketch is a great application by Bohemian Coding which is very simple to use, but still very powerful.
This is the finished product. Although it's not perfect, it's still a great way to explore vector graphics, and how to use Sketch.
Drag the buttons to their respective places. Take a reference from the picture and drag them approximately to their correct areas. If the buttons are overlapping on the body of the phone, select the button, and click "Backward" on the top right corner to send the button behind.

Make an small circle by selecting the oval tool, and resize the dimensions to those given below.

Apply the Angular gradient, and choose a greenish grey and bluish grey hue. Drag the opacity slider to adjust the opacity.


Now as a finishing touch, round off the edges of the main body, to account for the curves.
Now export in any format you wish.
Here is the download link for the finished product: Download Nokia Lumia 920 Vector Graphic
This is the finished product. Although it's not perfect, it's still a great way to explore vector graphics, and how to use Sketch.

To make a realistic object, the dimensions have to be proportional to the real object. Nokia has the dimensions of the 920 on their website, and with those dimensions, we can start making the phone.

Open Sketch.

Make a rectangle with the dimensions provided by Nokia.

Now scale the rectangle using the same ratio. The lock button locks the ratio of Width to Height.
Disable the Border, and add a gradient.

Click one dot, and chose the lighter shade.

On one side, bring the lighter and darker dot extremely close to each other, so that there is a clear distinction. Repeat this for the other dots on the other side.
Once you repeat for the other side, you can see the light reflecting off the body.

To give some depth to the body, add the inner shadow.

Now create another rectangle which will be the screen.

These are the dimensions. The Radius adds curves to the edges.

Drag the screen to the center, and the guidelines will help you place exactly on the center. To create the gradient on the glass screen will be slightly more complicated as the screen is curved at the sides. So a curved gradient will be needed.
Choose the first screen, and apply a Radial gradient.
Apply the gradient as before, with the dark and grey dots nearly touching each other. Drag the circumference of the radial gradient in the manner shown to get a bit of curve in the gradient. Adjust it as you see fit.

While the gradient is selected, add this specific gradient as we will use it for the other side of the screen.
Apply the gradient to the copy of the screen simply by clicking the saved gradient.
Now flip the copied screen horizontally.
Now drag the horizontally flipped copied screen on to the phone. Because the copied screen was shorter, it doesn't overlap the gradient on the original screen
Shift+click the both the screen layers, and Group them together.

Drag the speaker onto the phone.


Make a rectangle with the dimensions provided by Nokia.

Now scale the rectangle using the same ratio. The lock button locks the ratio of Width to Height.
 |
| Original dimensions. |
 |
| Click the lock symbol, and enlarge it. |
 |
| This is what it should look like, when scaled. It makes it easier to work with when scaled up. |
Disable the Border, and add a gradient.

Click one dot, and chose the lighter shade.
 |
| R:255 G:83 B:91 |
Now click the second dot, and choose the darker shade.
 |
| R:255 G:0 B:28 |
This what it will look like once you choose the shades

If you hover your mouse on the connecting line, a plus button pops up. Click, and another dot is created. Create two more dots, so that you have a total of 4 dots. Make sure that the inner two dots are of the same lighter shade, and the outer dots of the darker shade.
 |
| With more dots, you can further control the gradients and shades. |
On one side, bring the lighter and darker dot extremely close to each other, so that there is a clear distinction. Repeat this for the other dots on the other side.
 |
| Bring dots close together to create an illusion of reflection of light. |
Once you repeat for the other side, you can see the light reflecting off the body.

To give some depth to the body, add the inner shadow.
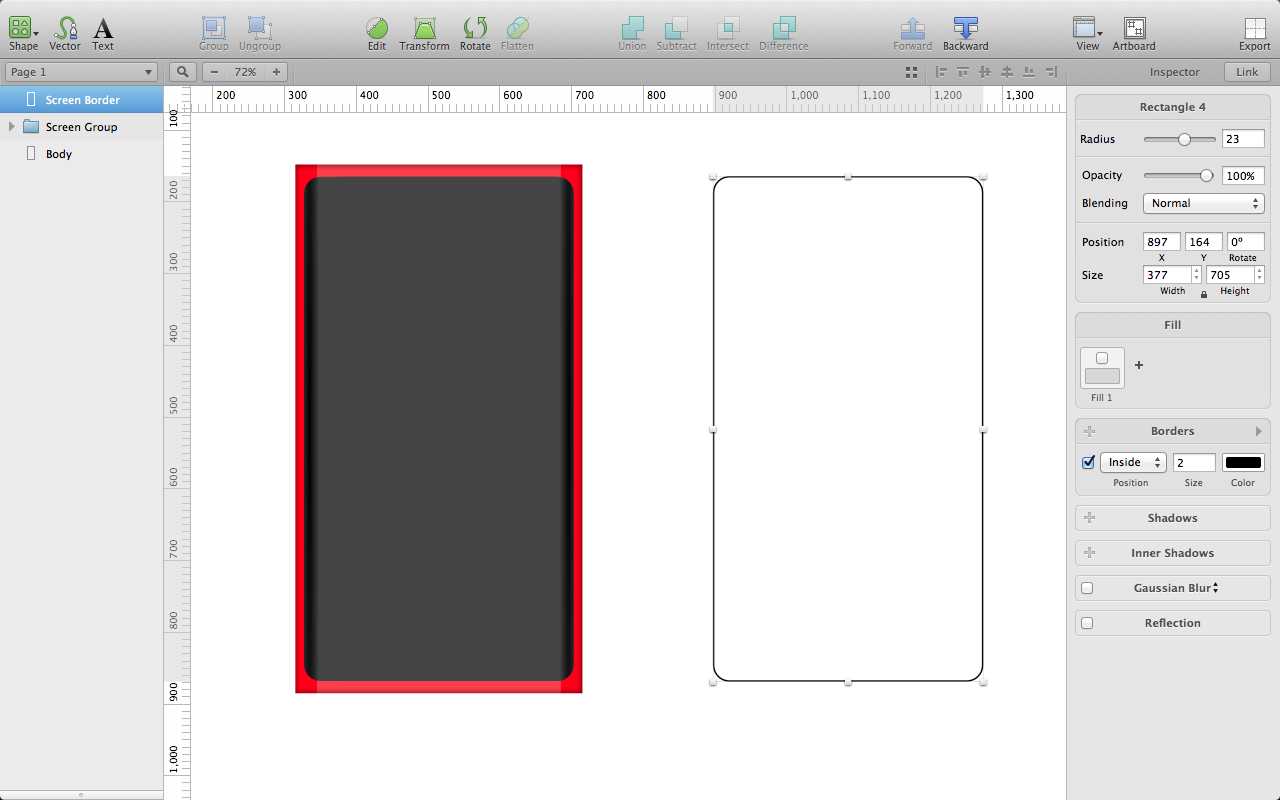
Now create another rectangle which will be the screen.

These are the dimensions. The Radius adds curves to the edges.
Drag the screen to the center, and the guidelines will help you place exactly on the center. To create the gradient on the glass screen will be slightly more complicated as the screen is curved at the sides. So a curved gradient will be needed.
 |
| Right click the screen, and click Duplicate. |
 |
| Drag the copy to the side, and resize it to make it smaller. W: 364 H:203 |
 |
| Place them side by side. |
Choose the first screen, and apply a Radial gradient.
 |
| Radial gradient adds a slight curve |
The darker colour is jet black, R:0 B:0 G:0. The lighter colour is light grey
 |
| R:69 G:69 B:69. You can choose a similar shade if you don't like these numbers. |
Apply the gradient as before, with the dark and grey dots nearly touching each other. Drag the circumference of the radial gradient in the manner shown to get a bit of curve in the gradient. Adjust it as you see fit.

 |
| This is how it will look like. Do the one side only for now. |
While the gradient is selected, add this specific gradient as we will use it for the other side of the screen.
 |
| Click the plus button to use later. |
Apply the gradient to the copy of the screen simply by clicking the saved gradient.
 |
| As usual drag the dots as close together as possible. |
Now flip the copied screen horizontally.
 |
| Flip Horizontally |
 |
| This is how it will look like after flipping it. |
Now drag the horizontally flipped copied screen on to the phone. Because the copied screen was shorter, it doesn't overlap the gradient on the original screen
 |
| Drag onto the screen using the guidelines. |
Shift+click the both the screen layers, and Group them together.
 |
| Group the screen layers so that it behaves as on object, and not as two separate ones. |

To add some depth to the screen, we will add a border to the screen with a slightly thicker border.
 |
| Take note of the dimensions of the border. |
 |
| Place the border onto the screen. |
Now create another small rectangle to make the speaker. Add a border to create depth.
 |
| The speaker is proportional to the size of the phone. |

The buttons on the side of the phone are rectangles. Apply the simple black and white gradient but leave just a hint of white on top. Give it a black border.
 |
| Round the buttons if you feel like. |
Dimensions of the buttons
 |
| Dimensions of larger button |
 |
| Dimensions of smaller button |
 |
| The rounded buttons. |
Drag the buttons to their respective places. Take a reference from the picture and drag them approximately to their correct areas. If the buttons are overlapping on the body of the phone, select the button, and click "Backward" on the top right corner to send the button behind.

Make an small circle by selecting the oval tool, and resize the dimensions to those given below.

Apply the Angular gradient, and choose a greenish grey and bluish grey hue. Drag the opacity slider to adjust the opacity.
 |
| Make the colours nearly transparent using the opacity bar to make the camera merge into the phone. |

Now add the 'NOKIA' logo. Download the Nokia Font: http://www.fontyukle.net/en/DownLoad-NokiaKokia.ttf
Now add the text to the phone. Note the position of the camera and logo in relation to the surrounding objects.

 |
| Increase Radius of body to 4 |
Now export in any format you wish.
Here is the download link for the finished product: Download Nokia Lumia 920 Vector Graphic
3 comments
Well done ! Really nice tutorial ! Are you on Dribbble ? I'd love to add you to my @sketchapp users list ;) http://dribbble.com/tristanremy/lists/7337-Sketchapp-Users-At-least-once
ReplyDeleteI'm not on Dribbble yet, but would love to upload my work on there!
DeleteI really need one! My old cover is so boring! So now i looking for a new nokia lumia cover. I read your post, that was very helpful for me. Visit for: iphone 4 covers indiaand skins for laptops. Thanks for sharing.
ReplyDeletewhat do you think?